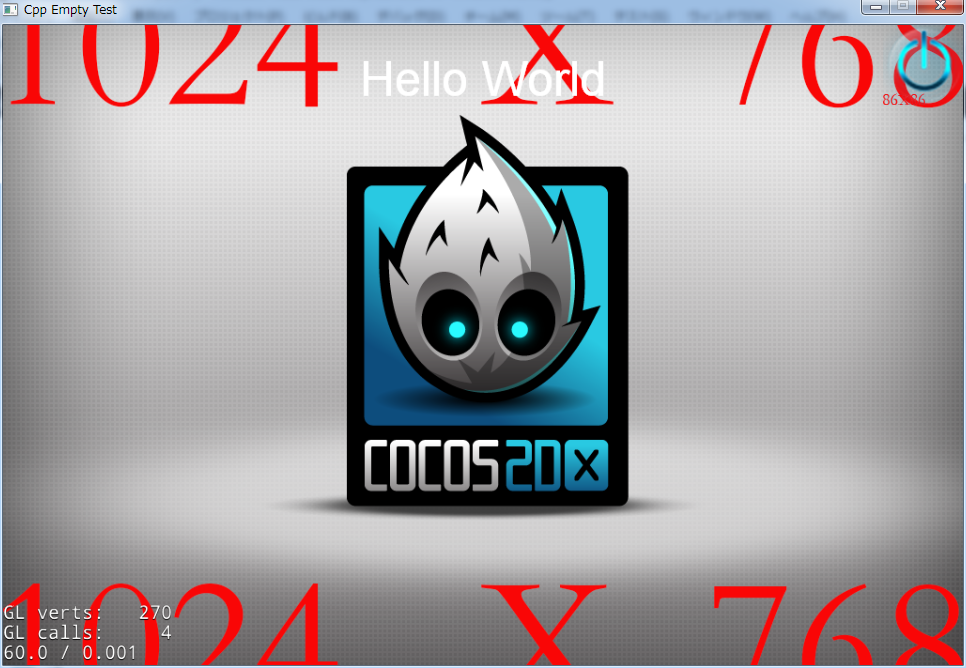
「cpp-empty-test」は cocos2d-x 3.1 ソリューションに含まれるテストプロジェクトで、Hello World 的なものである。

本稿では、そのソースを読んでみることにする。

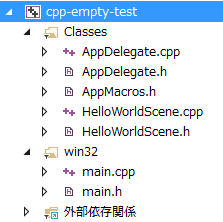
上図は、cpp-empty-test に含まれるファイルたちの一覧。
Classes, win32, 外部依存関係 の3つに分類されている。
Classes はプラットフォームに依存しない部分、win32 はプラットフォーム依存部分、外部依存関係は依存しているライブラリ群だ。
Classes はプロジェクト固有の実装を含む。AppDelegate.h, cpp は必須で、HelloWorldScene.h, cpp は表示されるシーンの宣言・実装ファイルだ。
win32 は Windows 用の起動部分。main.h, main.cpp が含まれる。
外部依存関係はその名の通り依存しているライブラリ群だ。かなりの数のファイルが含まれる。
"main.h":
#ifndef __MAIN_H__
#define __MAIN_H__

#define WIN32_LEAN_AND_MEAN             // Exclude rarely-used stuff from Windows headers

// Windows Header Files:
#include <windows.h>
#include <tchar.h>

// C RunTime Header Files
#include "CCStdC.h"

#endif    // __MAIN_H__
最初の2行はインクルードガード。
windows ヘッダ、C ランタイムヘッダをインクルードしている。
WIN32_LEAN_AND_MEAN の意味はよくわからない。
※ と書いてたら 電柱一家(@elf_deedlit)氏からツイッターで、コンパイル時間を短縮するため使用頻度の低いヘッダをインクルードしないオプションだとご教授して頂いた。
参照:高速ビルドおよび小容量のヘッダー ファイル
"main.cpp":
#include "main.h"
#include "../Classes/AppDelegate.h"

USING_NS_CC;

int APIENTRY _tWinMain(HINSTANCE hInstance,
                       HINSTANCE hPrevInstance,
                       LPTSTR    lpCmdLine,
                       int       nCmdShow)
{
    UNREFERENCED_PARAMETER(hPrevInstance);
    UNREFERENCED_PARAMETER(lpCmdLine);

    // create the application instance
    AppDelegate app;
    return Application::getInstance()->run();
}
最初に、"main.h" と、このプロジェクト固有の実装である AppDelegate.h をインクルードしている。
Win32 プログラムを組んだことある人にはお馴染みの WinMain() がある。
UNREFERENCED_PARAMETER() は指定引数を使用しないことをコンパイラに伝え、余計な警告を出さないでねというマクロのようだ。
で、Application オブジェクトを生成し、アプリケーションのインスタンスを取り出し、run() メソッドを呼んでいる。
これによりイベントループに入るものと推測される。
AppDelegate インスタンスは生成したが、それを参照している箇所がどこにも無い。いったいどうなっているのか?
Application::getInstance() はスタティック関数で、ソースは以下のようになっている。
Application* Application::getInstance()
{
    CC_ASSERT(sm_pSharedApplication);
    return sm_pSharedApplication;
}
スタティック変数の Application * sm_pSharedApplication; の値を返しているだけだ。
void *ptr = (void *)&app; で app のアドレスを取得しておき、Application::getInstance() が返す値と比べると見事に一致する。
ということは、AppDelegate の基底クラスのコンストラクタで、スタティック変数を初期化していると推測される。
で、実際にコンストラクタを見てみると、以下のようになっていた。ドンピシャだ!
Application::Application()
: _instance(nullptr)
, _accelTable(nullptr)
{
    _instance    = GetModuleHandle(nullptr);
    _animationInterval.QuadPart = 0;
    CC_ASSERT(! sm_pSharedApplication);
    sm_pSharedApplication = this;         // ポインタにインスタンスアドレスを格納
}
ということは、Application::getInstance()->run(); と周りくどい書き方をせず、単に app.run(); と書いても良さそうだが、 AppDelegate は Application を プライベート継承してるので、そうは問屋が卸さない。
何故プライベート継承しているのかは今のところ謎だ。
"AppDelegate.h":
#ifndef  _APP_DELEGATE_H_
#define  _APP_DELEGATE_H_

#include "cocos2d.h"

/**
@brief    The cocos2d Application.

The reason for implement as private inheritance is to hide some interface call by Director.
*/
class  AppDelegate : private cocos2d::Application
{
public:
    AppDelegate();
    virtual ~AppDelegate();

    /**
    @brief    Implement Director and Scene init code here.
    @return true    Initialize success, app continue.
    @return false   Initialize failed, app terminate.
    */
    virtual bool applicationDidFinishLaunching();

    /**
    @brief  The function be called when the application enter background
    @param  the pointer of the application
    */
    virtual void applicationDidEnterBackground();

    /**
    @brief  The function be called when the application enter foreground
    @param  the pointer of the application
    */
    virtual void applicationWillEnterForeground();
};

#endif // _APP_DELEGATE_H_
前章で、何故プライベート継承なのかは謎と書いたが、いきなり答えが書いてあった。
「The reason for implement as private inheritance is to hide some interface call by Director.」とのことである。
日本語に訳すと「ディレクターからいくつかのインタフェースを隠蔽したいため」かな?
具体的に何を隠蔽したいのかはわからないが、そういうことだ。
AppDelegate の中身は、コンストラクタとデストラクタ、それに仮想関数が3つだけ。
それぞれの仮想関数は、初期化時、アプリケーションがバックグラウンドになった時、フォアグラウンドに戻った時に呼ばれるようだ。
"AppDelegate.cpp":
#include "AppDelegate.h"

#include <vector>
#include <string>

#include "HelloWorldScene.h"
#include "AppMacros.h"

USING_NS_CC;
using namespace std;

AppDelegate::AppDelegate() {

}

AppDelegate::~AppDelegate()
{
}
上記は、AppDelegate.cpp の最初の部分。インクルードと、using 指定を行っている。
※ std::vetcor, std::string を知らない人はいないと思うが、
知らないひとは ここ や ここ を読んでね。;^p
コンストラクタとデストラクタの中身は空だ。
bool AppDelegate::applicationDidFinishLaunching() {
    // initialize director
    auto director = Director::getInstance();		//	ディレクター取得
    auto glview = director->getOpenGLView();		//	オープンGLビュー取得
    if(!glview) {		//	ビューが無い場合
        glview = GLView::create("Cpp Empty Test");		//	ビューを作成
        director->setOpenGLView(glview);		//	ディレクターさんに伝える
    }

    director->setOpenGLView(glview);		//	何故2回も設定する?

    // Set the design resolution
#if (CC_TARGET_PLATFORM == CC_PLATFORM_WP8)
    // a bug in DirectX 11 level9-x on the device prevents ResolutionPolicy::NO_BORDER from working correctly
    glview->setDesignResolutionSize(designResolutionSize.width, designResolutionSize.height, ResolutionPolicy::SHOW_ALL);
#else
    glview->setDesignResolutionSize(designResolutionSize.width, designResolutionSize.height, ResolutionPolicy::NO_BORDER);
#endif

	Size frameSize = glview->getFrameSize();

    vector<string> searchPath;

    // In this demo, we select resource according to the frame's height.
    // If the resource size is different from design resolution size, you need to set contentScaleFactor.
    // We use the ratio of resource's height to the height of design resolution,
    // this can make sure that the resource's height could fit for the height of design resolution.

    // if the frame's height is larger than the height of medium resource size, select large resource.
	if (frameSize.height > mediumResource.size.height)
	{
        searchPath.push_back(largeResource.directory);

        director->setContentScaleFactor(MIN(largeResource.size.height/designResolutionSize.height, largeResource.size.width/designResolutionSize.width));
	}
    // if the frame's height is larger than the height of small resource size, select medium resource.
    else if (frameSize.height > smallResource.size.height)
    {
        searchPath.push_back(mediumResource.directory);

        director->setContentScaleFactor(MIN(mediumResource.size.height/designResolutionSize.height, mediumResource.size.width/designResolutionSize.width));
    }
    // if the frame's height is smaller than the height of medium resource size, select small resource.
	else
    {
        searchPath.push_back(smallResource.directory);

        director->setContentScaleFactor(MIN(smallResource.size.height/designResolutionSize.height, smallResource.size.width/designResolutionSize.width));
    }

    // set searching path
    FileUtils::getInstance()->setSearchPaths(searchPath);

    // turn on display FPS
    director->setDisplayStats(true);

    // set FPS. the default value is 1.0/60 if you don't call this
    director->setAnimationInterval(1.0 / 60);

    // create a scene. it's an autorelease object
    auto scene = HelloWorld::scene();

    // run
    director->runWithScene(scene);

    return true;
}
上記は、アプリケーション起動時に呼ばれる AppDelegate::applicationDidFinishLaunching() の実装。本稿で一番大きな関数だ。
最初に Director::getInstance(); でディレクターさんを呼び出している。ディレクターがいつどこで誰によって生成されているかはいまのところ謎。 アプリケーションのコンストラクタで生成されていると推測されるので後で確認。
次に director->getOpenGLView(); で、現在のビューを取得。これがヌルポだった場合は、ビューを生成し、ディレクターのビューとして設定している。
が何故か2回も設定している。ビューは2回も設定しなくてはいけないほどよほど大事なことなのか?
Director::setOpenGLView(GLView *openGLView) のソースを読むと、最初に現在ビューと 引数のビューを比較し、一致していれば何もしないようになっている。 2回呼ぶ必要は皆無だった。2度めの setOpenGLView() コールは消した方がよい。
ついで、setDesignResolutionSize() をコールし、画面解像度を設定している。
文字列ベクターの searchPath を構築し、FileUtils::getInstance()->setSearchPaths(searchPath); で検索パスを設定している。 いったい何の検索パスなのか今のところ不明。
director->setDisplayStats(true); でFPS表示をONにしている。
director->setAnimationInterval(1.0 / 60); で 60FPS に設定している。
HelloWorld::scene(); で HelloWorld クラスのシーンインスタンスを取り出し、 director->runWithScene(scene); でそれを現シーンにしている。
// This function will be called when the app is inactive. When comes a phone call,it's be invoked too
void AppDelegate::applicationDidEnterBackground() {
    Director::getInstance()->stopAnimation();

    // if you use SimpleAudioEngine, it must be pause
    // SimpleAudioEngine::sharedEngine()->pauseBackgroundMusic();
}
// this function will be called when the app is active again
void AppDelegate::applicationWillEnterForeground() {
    Director::getInstance()->startAnimation();

    // if you use SimpleAudioEngine, it must resume here
    // SimpleAudioEngine::sharedEngine()->resumeBackgroundMusic();
}
cocos2d-x では画面のことをシーンと呼ぶようだ。シーンにはレイヤーがあったり、スプライトを配置したりできる。
また、アプリケーションには複数のシーンがあり、それをかっちょよく切り替えることができる。
んで、このプロジェクトは HelloWorld を表示するシーンがひとつだけで、HelloWorld はそのためのクラスだ。
#ifndef __HELLOWORLD_SCENE_H__
#define __HELLOWORLD_SCENE_H__

#include "cocos2d.h"

class HelloWorld : public cocos2d::Layer
{
public:
    // Here's a difference. Method 'init' in cocos2d-x returns bool, instead of returning 'id' in cocos2d-iphone
    virtual bool init();

    // there's no 'id' in cpp, so we recommend returning the class instance pointer
    static cocos2d::Scene* scene();

    // a selector callback
    void menuCloseCallback(Ref* sender);

    // implement the "static node()" method manually
    CREATE_FUNC(HelloWorld);
};

#endif // __HELLOWORLD_SCENE_H__
上記は HelloWorld クラスの宣言。
HelloWorld はシーンの派生クラスだと期待していたが、実はレイヤーの派生クラスだった。いきなり出鼻をくじかれた気分だ。
仮想関数がひとつ、スタティック関数がひとつ、メンバ関数がひとつと、謎の関数がひとつ宣言されている。
#include "HelloWorldScene.h"
#include "AppMacros.h"

USING_NS_CC;


Scene* HelloWorld::scene()
{
    // 'scene' is an autorelease object
    auto scene = Scene::create();

    // 'layer' is an autorelease object
    HelloWorld *layer = HelloWorld::create();

    // add layer as a child to scene
    scene->addChild(layer);

    // return the scene
    return scene;
}
scene() はスタティック関数で、シーンとレイヤーを生成し、レイヤーをシーンの子供にし、シーンを返す。
実際に表示オブジェクトを保有するのはレイヤーで、シーンの派生クラスを作成する理由が無いので、このようなクラス構成にしたのだと考えられる。
// on "init" you need to initialize your instance
bool HelloWorld::init()
{
    //////////////////////////////
    // 1. super init first
    if ( !Layer::init() )
    {
        return false;
    }

    auto visibleSize = Director::getInstance()->getVisibleSize();
    auto origin = Director::getInstance()->getVisibleOrigin();

    /////////////////////////////
    // 2. add a menu item with "X" image, which is clicked to quit the program
    //    you may modify it.

    // add a "close" icon to exit the progress. it's an autorelease object
    auto closeItem = MenuItemImage::create(
                                        "CloseNormal.png",
                                        "CloseSelected.png",
                                        CC_CALLBACK_1(HelloWorld::menuCloseCallback,this));

    closeItem->setPosition(origin + Vec2(visibleSize) - Vec2(closeItem->getContentSize() / 2));

    // create menu, it's an autorelease object
    auto menu = Menu::create(closeItem, NULL);
    menu->setPosition(Vec2::ZERO);
    this->addChild(menu, 1);

    /////////////////////////////
    // 3. add your codes below...

    // add a label shows "Hello World"
    // create and initialize a label

    auto label = LabelTTF::create("Hello World", "Arial", TITLE_FONT_SIZE);

    // position the label on the center of the screen
    label->setPosition(Vec2(origin.x + visibleSize.width/2,
                            origin.y + visibleSize.height - label->getContentSize().height));

    // add the label as a child to this layer
    this->addChild(label, 1);

    // add "HelloWorld" splash screen"
    auto sprite = Sprite::create("HelloWorld.png");

    // position the sprite on the center of the screen
    sprite->setPosition(Vec2(visibleSize / 2) + origin);

    // add the sprite as a child to this layer
    this->addChild(sprite);

    return true;
}
上記は初期化処理部分。
まずは レイヤークラスの初期化関数をコール。
次にクローズボタンを作り、それをメニューにし、this->addChild() でメニューにしている。
"CloseNormal.png", "CloseSelected.png" はリソースディレクトリ内にある電源マークの終了ボタン画像だ。
次に "Hello World" テキストをもつラベルオブジェクトを生成・配置し、 最後に HelloWorld.png 画像のスプライトを生成し、画面中央に配置している。
void HelloWorld::menuCloseCallback(Ref* sender)
{
#if (CC_TARGET_PLATFORM == CC_PLATFORM_WP8) || (CC_TARGET_PLATFORM == CC_PLATFORM_WINRT)
	MessageBox("You pressed the close button. Windows Store Apps do not implement a close button.","Alert");
    return;
#endif

    Director::getInstance()->end();

#if (CC_TARGET_PLATFORM == CC_PLATFORM_IOS)
    exit(0);
#endif
}
上記はクローズボタンが押された場合のコールバック処理を行う関数の実装。
Windows Store Apps はクローズ出来ない?ようなので、警告を出している。
そうでなければ、ディレクターの end() をコールして、アプリケーションを終了している。
AppMacros.h では画面解像度に関するいろんな定数が宣言されているぞ。
#ifndef __APPMACROS_H__
#define __APPMACROS_H__

#include "cocos2d.h"

/* For demonstrating using one design resolution to match different resources,
   or one resource to match different design resolutions.

   [Situation 1] Using one design resolution to match different resources.
     Please look into Appdelegate::applicationDidFinishLaunching.
     We check current device frame size to decide which resource need to be selected.
     So if you want to test this situation which said in title '[Situation 1]',
     you should change ios simulator to different device(e.g. iphone, iphone-retina3.5, iphone-retina4.0, ipad, ipad-retina),
     or change the window size in "proj.XXX/main.cpp" by "CCEGLView::setFrameSize" if you are using win32 or linux plaform
     and modify "proj.mac/AppController.mm" by changing the window rectangle.

   [Situation 2] Using one resource to match different design resolutions.
     The coordinates in your codes is based on your current design resolution rather than resource size.
     Therefore, your design resolution could be very large and your resource size could be small.
     To test this, just define the marco 'TARGET_DESIGN_RESOLUTION_SIZE' to 'DESIGN_RESOLUTION_2048X1536'
     and open iphone simulator or create a window of 480x320 size.

   [Note] Normally, developer just need to define one design resolution(e.g. 960x640) with one or more resources.
 */

#define DESIGN_RESOLUTION_480X320    0
#define DESIGN_RESOLUTION_1024X768   1
#define DESIGN_RESOLUTION_2048X1536  2

/* If you want to switch design resolution, change next line */
#define TARGET_DESIGN_RESOLUTION_SIZE  DESIGN_RESOLUTION_480X320

typedef struct tagResource
{
    cocos2d::Size size;
    char directory[100];
}Resource;

static Resource smallResource  =  { cocos2d::Size(480, 320),   "iphone" };
static Resource mediumResource =  { cocos2d::Size(1024, 768),  "ipad"   };
static Resource largeResource  =  { cocos2d::Size(2048, 1536), "ipadhd" };

#if (TARGET_DESIGN_RESOLUTION_SIZE == DESIGN_RESOLUTION_480X320)
static cocos2d::Size designResolutionSize = cocos2d::Size(480, 320);
#elif (TARGET_DESIGN_RESOLUTION_SIZE == DESIGN_RESOLUTION_1024X768)
static cocos2d::Size designResolutionSize = cocos2d::Size(1024, 768);
#elif (TARGET_DESIGN_RESOLUTION_SIZE == DESIGN_RESOLUTION_2048X1536)
static cocos2d::Size designResolutionSize = cocos2d::Size(2048, 1536);
#else
#error unknown target design resolution!
#endif

// The font size 24 is designed for small resolution, so we should change it to fit for current design resolution
#define TITLE_FONT_SIZE  (cocos2d::Director::getInstance()->getOpenGLView()->getDesignResolutionSize().width / smallResource.size.width * 24)

#endif /* __APPMACROS_H__ */
cocos2d-x 3.1 の cpp-empty-test のソースコードをざっと読んでみた。
まだ一部意味不明な箇所もあるが、大雑把には理解できたと思う。